Do you want to play both Beat Saber custom songs and multiplayer? In this guide, we will show you how to toggle Beat Saber between modded and unmodded versions.
The new Beat Saber multiplayer update launched alongside the Oculus Quest 2 headset. It allows you to play songs from the game against other players in real-time in a new multiplayer mod.
At the same time, a new BMBF update for Beat Saber allows users to load real-life custom songs onto the game. The problem is that when you mod Beat Saber, you lose the ability to play in multiplayer mode.
But a clever solution using an app called Playlist Editor Pro allows you to toggle Beat Saber. And in the instructions below, we’ll go over exactly how!
What is Playlist Editor Pro?

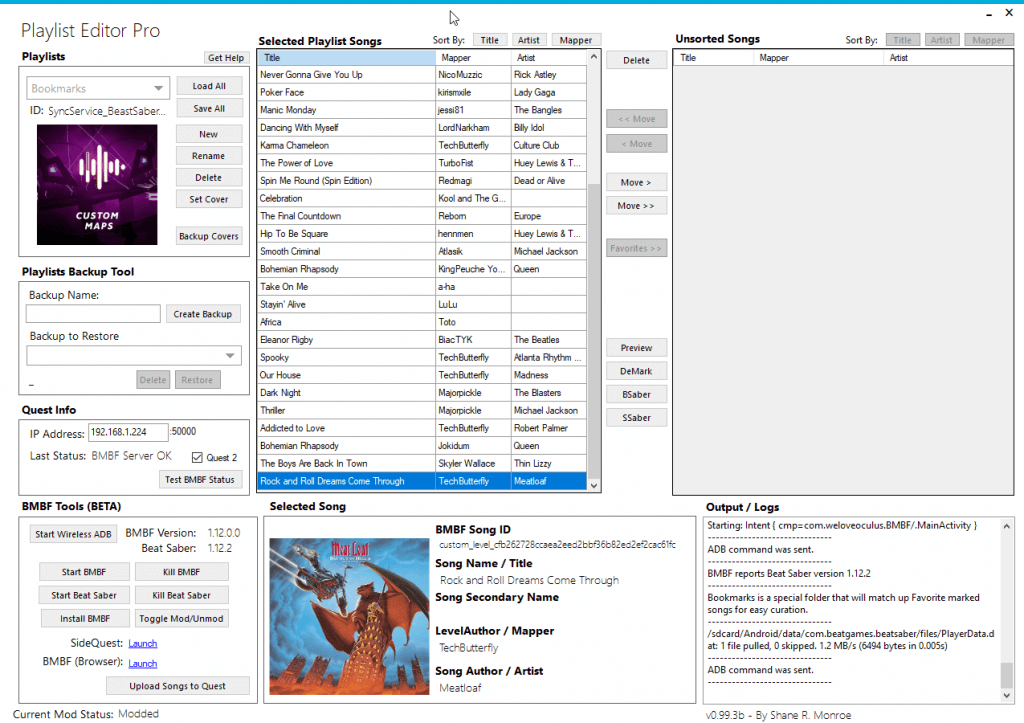
Playlist Editor Pro is a Windows application for Beat Saber that allows you to edit your custom playlists on your computer instead of inside of your Quest headset. The playlist editor inside of BMBF in your headset is cumbersome to use and not user friendly. Playlist Editor allows you to edit this with your mouse and keyboard outside of BMBF.
A full set of features that the app has is:
- Create / Delete / Edit Playlist
- Add custom covers to your playlist
- Add / Remove and transfer songs between playlists
- Preview song metadata (cover, title, mapper, etc)
- Create BACKUPS of your playlist configuration
- Restore backups after BMBF/Beat Saber updates
- Easily “de-bookmark” a song on Beast Saber out of your bookmarks if you no longer want it
- “Preview” a song using Rabbit’s awesome web player
- Quickly access the song on Beast Saber to add ratings, reviews, and more
You can automatically toggle between the modded and unmodded versions of Beat Saber with Playlist Editor Pro v0.99.3b installed.
Before we show you how to toggle Beat Saber between your modded and unmodded versions, let’s go over a few prerequisites first.
Requirements to Toggle Beat Saber with Playlist Editor Pro
- Oculus Quest 1 or 2
- Playlist Editor Pro downloaded and installed on your computer (Windows version only) – must be version 0.99.3b
- Beat Saber (Multiplayer Edition) installed on your Quest or Quest 2 – successfully modded with BMBF. Click here to mod your Beat Saber.
- Sidequest installed and recognized by Playlist Editor Pro (look at the Output / Logs window when you run Playlist Editor Pro). Click here to install SideQuest.
- Your Quest connected to your PC – SideQuest should show that it is connected
- The IP address of your Quest (put into Playlist Editor Pro)
How to Toggle Beat Saber Modded and Unmodded Version with Playlist Editor Pro
- Make sure you have the modded Beat Saber with BMBF all setup and installed on your Oculus Quest 2.
- Connect your Oculus Quest to your PC.
- Install Playlist Editor Pro v0.99.3b and launch it.
- You will be prompted to install the unmodded multiplayer version of Beat Saber. Select this option and let PEP do its thing.
- Once it is done, your Oculus Quest 2 will contain two installed version of Beat Saber: one modded for custom songs and one unmodded for multiplayer support
- Click the “Toggle Mod/Unmod” and watch the Output /Logs window. You will see a success message as the process works. The first time you switch to mod/unmod, an error is shown because you don’t have any backup data yet.
- Once done, PeP will show you are now “Un-Modded” in the lower left corner.
- Test your copy of modded Beat Saber. Make sure you reconnect your Quest to the PC before continuing.
- Come back to PeP – Click Toggle Mod/Unmod. Watch the output logs window to ensure success.
- Test your copy of modded Beat Saber – you should be able to toggle Beat Saber between the two versions.
- Report success/failure to the Discord.

Video Demo
Check out the video demo below to see everything in action.
Thanks to /u/darkuni on reddit for the instructions on how to get this to work!
Comment below and let us know if this process worked for you!


