In this guide, I’ll show you how easy it is to install Emudeck on Steam Deck and play retro Nintendo, Sony, and Microsoft games. This step by step guide walks you through the entire process, including:
Information about Emudeck, Steam ROM Manager, and Emulation Station
How to install Emudeck on your Steam Deck in ten minutes or less
How to get started finding and installing ROMs and Bios files
Emudeck is installed on Steam Deck directly on the device and requires no external connections at all.
If you need help, comment below and let us know where you are having trouble!
Related: Check out how to get higher FPS and performance on the Steam Deck!
Key Takeaways
Emudeck is a powerful emulator frontend for the Steam Deck that offers a unified platform for playing retro games. It enhances the gaming experience by seamlessly integrating the Steam Deck’s controller configurations and Steam ROM Manager.
Installing Emudeck can be done completely from Desktop Mode on your Steam Deck.
Most emulators can be used when you install ROM files onto the Steam Deck, while newer consoles, such as the Nintendo Switch, require BIOS files that mimic the real hardware.
What is Emudeck?
EmuDeck is a powerful emulator frontend designed to enhance the gaming experience on the Steam Deck. EmuDeck is a single home for all retro gaming consoles. Instead of downloading each individually, installing Emudeck will allow you to play games on all systems.
EmuDeck’s seamless integration with the Steam Deck’s controller configurations sets it apart. Emudeck leverages custom Steam Input Profiles to provide a user-friendly and expert-like interface for playing classic games.
With a graphical wizard, installation is simplified to just a few clicks. If you’re a fan of personalization, EmuDeck’s Custom Mode empowers you to tweak settings, such as:
shaders
aspect ratios
themes
Emudeck integrates seamlessly with the Steam Deck’s Steam ROM Manager, enabling the addition of games to your Steam Library with box art, blending classic and modern titles for a well-organized gaming experience.
EmuDeck is the ideal tool for those wishing to relive retro gaming nostalgia on their Steam Deck.

Steam Rom Manager
Installed along Emudeck is the Steam Rom Manager, allowing you to download and install artwork and metadata for all your rom games. Where Emudeck contains all of the important files behind the scenes, Rom Manager automatically allows you to browse and download images.
You will run Steam Rom Manager in desktop mode.

Emulation Station
Also installed alongside Emudeck is Emulation Station. You will use this user interface to browse and launch your games. All the images and metadata you use Steam Rom Manager to download will appear in Emulation Station automatically.
If all of this sounds complicated, don’t worry! After you install the main Emudeck installer using my guide below, the other components are easy and intuitive.

Key Features of Emudeck
Below are some of the key features of Emudeck:
Customization
EmuDeck provides extensive customization options, allowing you to tailor your retro gaming experience to your unique preferences. Whether it’s shaders, aspect ratios, or themes, you can make EmuDeck suit your style.
Seamless Integration
One of EmuDeck’s standout features is its seamless integration with the Steam Deck’s controller configurations. This integration ensures you can navigate classic games effortlessly, using button combinations familiar to gaming enthusiasts.
Box Art Integration
EmuDeck lets you add classic games with box art to your Steam Library. This feature allows for a visually appealing and organized gaming experience, blending retro favorites with modern PC titles.
Emulation Station Frontend
With the user-friendly EmulationStation Desktop Edition, managing and launching your ROMs becomes a breeze. This front end is designed with aesthetics, offering a beautiful user interface that you can customize with various themes.
New Emudeck Features
Version 2.1 of Emudeck brought new changes and features to the software:
An updated user interface
Quick settings so that you don’t need to reinstall to apply customizations.
The ability to back up your save games to the cloud
New controller bindings and hotkeys
New Emulators: Vita3K, ScummVM and DooM.
General performance improvements
Accessories for Emudeck
I do a ton of retro gaming on my Steam Deck, and there are two key accessories I recommend to improve your experience:
- Steam Deck dock if you plan on playing games on your TV a lot
- Wireless Bluetooth controller to make the experience more authentic
- Retro Bluetooth Controller if you like old Nintendo nostalgia
What Emulators Does Emudeck Support?
EmuDeck boasts support for diverse emulators, making it a versatile platform for playing games from a wide range of classic consoles.
The full list of emulators supported by Emudeck on Steam Deck is:
Atari
Sega Genesis
GameBoy
GameBoy Advance
GameBoy Color
GameBoy DS
GameBoy 3DS
Nintendo
Super Nintendo
Nintendo Wii
Nintendo Wii U
Nintendo Switch
- Nintendo GameCube
PlayStation 1
PlayStation 3
Sony PSP
PC Engine
These emulators allow gamers to dive into a treasure trove of classic titles, from 16-bit adventures to 3D classics, delivering a comprehensive retro gaming experience on the Steam Deck.
EmuDeck’s extensive support for these emulators ensures you can relive the golden age of gaming across multiple generations and consoles, all conveniently accessible on your Steam Deck.
Does Emudeck Include Games?
No, Emudeck only contains the emulation software that mimics older gaming systems. To play retro games, you need to download ROM files for each game.
Because the legality of ROMs are different for each country and system, we can’t share information and how to do this. In general, you are legally allowed to download game roms as long as you own the original game as well.
Do your own research!
How to Install Emudeck on Steam Deck (Step by Step)
Follow these step by step instructions and I’ll have you playing emulated games in just a few minutes.
Enter Desktop Mode
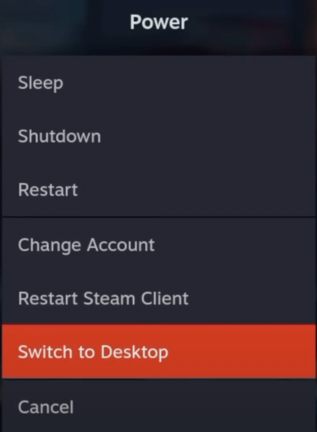
The first step to get Emudeck installed is to switch your Steam Deck to Desktop Mode. Hold down the power button at the top of the device and select “Switch to Desktop Mode” to do this. This step is essential to access the required desktop features for setting up EmuDeck.

Open up a Web Browser
Once in Desktop Mode, open up a web browser. By default, Steam comes with Firefox installed on it.

Download EmuDeck
In your browser, navigate to the EmuDeck website by typing “emudeck.com” into the address bar. This is where you will find the official EmuDeck download.

Accept Cookies and Download
Upon reaching the EmuDeck website, you may need to accept cookies, as is standard on many websites. Once that’s done, locate and click on the download button in the webpage’s top corner.
Open the Installation Folder
After initiating the download, locate the EmuDeck installation file. This file will be in your Downloads folder. Find it and double click on it to open up the Emudeck installer.

Begin Installation
During the installation, the installer will guide you through the setup. When prompted, click “Continue” to initiate the installation. Keep in mind that this installation may take around 10 minutes to complete.
Select Custom Mode
Once the installation process is finished, EmuDeck will present you with the “Welcome to EMU deck” page. You can choose between “Easy Mode” and “Custom Mode.”
For a more tailored setup, opt for “Custom Mode.”

Choose ROM Directory
In the Custom Mode, you’ll have the opportunity to select your preferred ROM directory. This can be either on the Steam Deck’s internal storage or on a micro SD card if you have one.
Make your selection and click “Continue.”

Select Device
Choose “Steam Deck” as your device when you’re on a Steam Deck. This ensures that EmuDeck is optimized for your gaming device. Click “Continue” to proceed.

Configure Emulators
EmuDeck will provide you with a list of emulators to choose from. You can turn off any emulators that you don’t plan to use or leave all the emulators selected on..
Once you’ve made your selections, click “Continue.”

Auto Updates
At this point, you’ll have the option to turn on or off auto updates for your emulators. Decide whether you want these updates to be automatic and click “Continue.” I recommend that you keep auto-updates turned ON.
EmuDeck offers various custom settings, including auto-save options and aspect ratios. Customize these settings according to your preferences. Once you’ve made your selections, continue with the setup process.

Add BIOS File (if necessary)
You may need BIOS files for some of the more modern emulators, such as those for PlayStation 2. Place these BIOS files in the “bios” folder next to your ROMs if required.
If you don’t do this step now, you can also install bios files to your Steam Deck hard drive later on and Emudeck will recognize them the next time it starts up. If you don’t install these, you will see a “missing BIOS files” error if you try to run a ROM file on these systems.
Add Games
With EmuDeck now installed, you can start adding your games. Locate the folder where you have your ROMs, and drag and drop your game files into the corresponding emulator folders.
This action populates your EmuDeck with the games you want to play.
And that’s it!
You can now switch back to Gaming Mode and run games in Emulation Station, which is the frontend interface for Emudeck.
Final Thoughts
Emudeck is an awesome way to install all of the emulators at one time. The alternative is to perform each emulator installation separately, which is a ton of work!
After you are done installing it, you are one step closer to replaying older games on the Steam Deck. If you have any trouble with your Emudeck install on Steam Deck, comment below and let us know.

