This is the ultimate guide to playing retro games on the Meta Quest. This includes the Nintendo, Super Nintendo, N64, Wii, Gamecube, and others. We’ll touch on all VR emulator details, including:
- How to play retro games on the Meta Quest 3, Pro, 2 and 1.
- The different emulators that work on the Meta Quest VR headset.
- Advantages and disadvantages of each VR emulator, including which has native Oculus touch controller support.
- Tips for getting games to run smoothly.
This guide is made for the Meta Quest 3 and works with older headsets like the Quest Pro, Quest 2, and the original Oculus Quest.
If we’ve missed anything in this Meta Quest VR emulators and ROM guide, please let us know by commenting below!
What is an Emulator?
An emulator is a piece of software that emulates older gaming consoles on modern PC, Mac, Linux, or Android devices. They are popular for playing classic retro games from older gaming consoles.
With an emulator, you can play old Pokemon, Mario, and other games on your TV. Since the Meta Quest is an Android-based VR headset, it has native support for many Android emulators available today. And with a little reading time and customization effort, you can play classic retro games in your VR headset.
Roms
Roms are the specific game files that an emulator can play. They contain all the game data and files needed to play retro games.
Overall, emulators represent a gaming console, and ROMs represent the game. You can play many ROMs on a single emulator.
Roms are a bit of a legal grey area, so we can’t show you where to find them out of respect. In most jurisdictions, you can safely download the ROMs of games you already own. A quick Google search will find you more information.
What Consoles are Supported on the Meta Quest
Generally, any gaming console from 2007 and earlier can be emulated on today’s computing hardware. This includes the Nintendo Wii or earlier and the Sony Playstation Two.
There is an Android-based emulator for the Nintendo Switch, but the reliability is not quite high enough yet.
Here is an incomplete list of the different gaming consoles you can play with an emulator:
- Nintendo / Super Nintendo / Nintendo DS / Wii / Gamecube / Switch
- Game Boy / Game Boy Advance / Game Boy Color / DS / 3DS
- Playstation One / Two
- Sega Saturn
- DOS
- Lynx
- Atari 2600
- MAME
Below, we’ll show you all the VR emulators that are compatible with the Meta Quest. We’ll also tell you which consoles they emulate and the pros and cons of each. We’ll also give you step-by-step instructions on how to get setup and started.
Before that, there are a few requirements you must perform on your Meta Quest headset.
Requirements to Use VR Emulators
A few basic requirements must be in place before installing any VR emulators or ROMs below.
SideQuest
SideQuest is a third-party app store for the Meta Quest, which allows you to side-load unofficial apps to your headset. Many emulators below exist in SideQuest, where you can install them with a single click. Other emulators are downloaded manually but still side-loaded with SideQuest.
Click here to view our SideQuest VR install and setup guide.
Follow the instructions above, which will open in a new tab, and then come back here and continue.
Bluetooth Controller
Some emulators below let you use the official Oculus touch controllers to play games. Others don’t have proper button mapping set up for Touch controllers. All of them support using a Bluetooth controller, which is mapped like a traditional gamepad.
Click here to view our Bluetooth Controller setup guide for the Meta Quest.
If you have a compatible controller, connect it to your Meta Quest so that you don’t have to do it later.
If you don’t have a Bluetooth controller yet, check out our top two controllers for the Quest below.
[amazon box=”B01GW3H3U8″]
[amazon box=”B00QTSR5GO”]
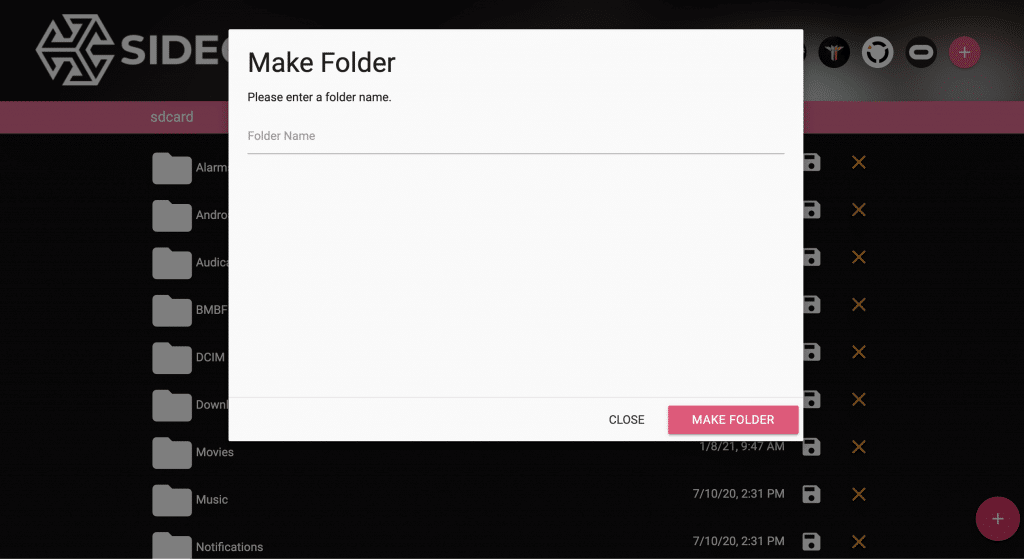
Create a New Folder on Your Meta Quest
Nearly all solutions listed in this guide require you to create a new folder on your Meta Quest where you will store your ROMs. General instructions on how to do this are:
- Open up SideQuest (after you’ve installed and set it up using the guide above).
- Click on the folder icon in the top right, which will say Manage files on the headset when you hover over it.
- Hover on the pink circular + button in the bottom right and then select the blue “Make a folder in this folder” option.
- Enter your folder name and then select Make Folder.
With these few tips above, you should be able to set up all retro game VR emulators we’ve listed below! If we’ve missed any popular emulators or you have some extra tips to offer, comment down at the bottom of this guide.
Retroarch on the Meta Quest
Retroarch is a collection of hundreds of different emulators loaded into one single package. It is the most popular way to play retro games today.
Many of the emulators listed below are loaded into Retroarch as well.
Getting started with VR emulators using Retroarch takes a few more steps but has some nice advantages too. You first have to install Retroarch, then install all the emulators you want, and finally load your Roms.
Pros
- Retroarch gives you access to hundreds of emulators for all different consoles.
- Display and graphic settings can be configured once for Retroarch and applied to all emulators.
- You can play all of your Roms inside one single program instead of loading multiple emulators.
Cons
- Setup can be more involved than other methods.
- You’ll take up more space on your Meta Quest if you get carried away installing emulators with one click.
- There is no Touch Controller support, so you must use a Bluetooth Controller to play.
How to Install Retroarch on the Meta Quest
- Click here and download the 64-bit Android version of Retroarch for the Meta Quest.
- Connect your Quest headset to your computer and open up SideQuest VR.
- Click on the folder icon at the top right, which says Manage Files on Your Headset.
- Take the Retroarch APK file you downloaded above and drag it onto the SideQuest logo in the top left corner of the screen.
- Disconnect your VR headset from your computer and put it on.
- Make sure your Bluetooth controller is connected, or follow this guide if you need help to set it up.
How to Play Games with Retroarch on the Meta Quest 2
- Use the instructions above to create a directory on your Quest for game ROMs.
- Download ROMs and move them into the directory on your headset. NOTE: Due to their grey-area nature, we can’t show you how to do this.
- In your headset apps, open up the Oculus TV app.
- Click on Retroarch to launch Retroarch.
- Ensure that your Bluetooth controller works and you can navigate through the menus.
- If this is your first time using Retroarch, navigate to Load Core > Download Core and download the emulators for the game systems you want. The most popular ones are:
- Game Boy Advance – mGBA
- Game Boy/Game Boy Color – Gambatte
- Nintendo (NES) – Nestopia
- Nintendo 64 – Mupen64Plus
- PlayStation – PCSX-ReARMed
- Sega Genesis/Game Gear – Genesis Plus GX (PicoDrive from Sega 32X games)
- Super Nintendo (SNES) – Snes9X
- Launch a ROM by going to Load Content and then navigating to the file folder you created in step 1. Select your ROM file, and Retroarch will begin your VR emulator so you can play the game.
Dolphin Emulator on the Meta Quest

Dolphin Emulator is made to play Nintendo Wii and Gamecube ROMs. This VR emulator only works on the Meta Quest 2 and newer (Quest 3 and Quest Pro). It does not work on the original Oculus Quest. It takes advantage of the extra processing power and Vulkan rendering support offered by the Snapdragon XR chips. Dolphin will run on the Quest 1, but you will see a lot of frame rate drops and choppy audio.
If you are having trouble with the Dolphin VR emulator, make sure you are using the MMJ fork version. It has been optimized for gameplay on the Meta Quest 2.
Pros
- Plays newer console games
Cons
- Does not work on the Oculus Quest 1
- No Oculus Touch controller support (Bluetooth controller only)
How to Install Dolphin Emulator on the Meta Quest
- Click here and download the modified MMJ version of Dolphin Emulator for the Meta Quest. You want to download the APK file of the latest version.
- Connect your Quest headset to your computer and open up SideQuest VR.
- Click on the folder icon at the top right, which says Manage Files on Your Headset.
- Take the Dolphin Emulator APK file you downloaded above and drag it onto the SideQuest logo in the top left corner of the screen.
- Disconnect your VR headset from your computer and put it on.
- Make sure your Bluetooth controller is connected, or follow this guide if you need help to set it up.
How to Play Games with Dolphin Emulator on the Meta Quest (3, Pro, 2, 1, etc)
- Use the instructions above to create a directory on your Quest for game ROMs.
- Download ROMs and move them into the directory on your headset. NOTE: Due to their grey-area nature, we can’t show you how to do this.
- In your headset apps, open up the Oculus TV app.
- Click on Dolphin Emulator to launch it.
- Ensure that your Bluetooth controller works and you can navigate through the menus.
- Launch a ROM by going to Browse Folder and selecting your ROM file.
M64Plus
Mupen64Plus is an N64 emulator which lets you play N64 games. It is one of the most popular and polished emulators of all time. The N64 is one of the newest gaming consoles with near flawless emulation.
There is a version of M64Plus that is optimized for the Android operating system. Fortunately, this version can easily be sideloaded to your Quest and used to play N64 ROMs.
Use the instructions below to get started.
How to Install Mupen64Plus on the Meta Quest
- Click here to download the Android version of Mupen64Plus for the Meta Quest. Click the zip source code.
- Connect your Quest headset to your computer and open up SideQuest VR.
- Click on the folder icon at the top right, which says Manage Files on Your Headset.
- Take the Mupen64Plus APK file you downloaded above and drag it onto the SideQuest logo in the top left corner of the screen.
- Disconnect your VR headset from your computer and put it on.
- Make sure your Bluetooth controller is connected or follow this guide if you need help to set it up.
How to Play Games with M64Plus on the Meta Quest
- Use the instructions above to create a directory on your Quest for game ROMs.
- Download ROMs and move them into the directory on your headset. NOTE: Due to their gray-area nature, we can’t show you how to do this.
- In your headset apps, open up the Oculus TV app.
- Click on Mupen64Plus to launch it.
- Ensure that your Bluetooth controller works and you can navigate through the menus.
- Launch a ROM by going to the RELOAD icon (bottom right menu item) and selecting your ROM folder. When you select your folder, the ROMs inside of that folder will be selectable from the main menu of Mupen64Plus.
Gamebov

Gamebov is a Game Boy Color emulator for the Oculus Quest 1 and Go. It allows you to play all GBC games in VR inside a 3D environment. Unfortunately, Gamebov does not work on the Oculus Quest 2 yet. We hope to see an update soon that will make it work again.
Gamebov is available on the SideQuest VR platform to install today.
Pros
- Emulates the Game Boy Color great.
- Interactive 3D environment to play GBC in virtual reality
Cons
- Does not work on the Meta Quest 2
- Require a Bluetooth Controller (no Touch controller support)
How to Install Gamebov on the Meta Quest
- Connect your Quest headset to your computer and open up SideQuest VR.
- In the Search Games box, enter in Gamebov
- Click on the Gamebov tile to open up it’s app page.
- Click on Install to Headset and wait for Gambov to finish installing.
How to Use the Gamebov VR Emulator
- In the root directory of your Meta Quest, create a new folder and call it gb.
- Place your Game Boy Color games in this “gb” folder.
- From the home screen within the headset, select Library.
- Select Unknown Sources.
- Select GameBov.
- Select your ROM inside the Gamebov VR emulator and play!
VirtualBoyGo

VirtualBoyGo is an emulator for the Virtual Boy, a VR headset-like console released by Nintendo in 1995. It was the first console to feature 3D stereoscopic graphics. At the time, the Virtual Boy was a failure. Today, it’s a perfect fit as a VR emulator for the Meta Quest.
VirtualBoyGo is able to play Virtual Boy games with ease. This emulator has one of the highest ratings of all SideQuest VR games. Game are displayed in a full panoramic view, allowing you to enjoy Virtual Boy as it was intended.
Pros
- Run Virtual Boy ROMs great
Cons
- Only runs Virtual Boy ROMs
How to Install VirtualBoyGo
- Connect your Quest headset to your computer and open up SideQuest VR.
- In the Search Games box, enter in VirtualBoyGo
- Click on the VirtualBoyGo tile to open up it’s app page.
- Click on Install to Headset and wait for VirtualBoyGo to finish installing.
How to Use the VirtualBoyGo VR Emulator
- Navigate to the ROMS folder from the root of your Meta Quest (create it if it does not exist).
- In the ROMS folder, create a new folder and call it VB.
- Place your Virtual boy ROM games in this “VB” folder.
- From the Oculus home screen within the headset, select Library.
- Select Unknown Sources.
- Tap on VirtualBoyGo.
- Select your ROM inside the VirtualBoyGo emulator and play!
Citra Emulator on the Meta Quest

Citra Emulator is a Nintendo 3DS VR emulator. The emulator itself is in a beta state and not all games work yet. Citra could not run on the original Quest 1 very well, but it is working better for the Meta Quest
We would not recommend trying Citra, but you can download it from here if you want to try.
What other VR emulators for the Meta/Oculus Quest have you tried? Which one is your favorite?
Comment below and let us know below.