Are you looking to optimize Praydog’s mod to turn PC games running Unreal Engine 4 to 5? In this guide, I’ll show you the UEVR tips and tricks that have helped me improve dozens of new PC games I’ve been playing in virtual reality.
I’ve broken down each tip below in instructions that are easy to follow. I have UEVR tips on things like:
Pre injection settings
How to improve latency
Adding motion controls to regular games
Fixes and improvements to the graphics quality
How to get proper first-person camera views
Bookmark us because I keep adding new tips to the guide! You can also comment below and let me know the tip that works the best for you!
Related: Learn how to install UEVR and get setup the right way.
Before We Begin
Before I get into the best UEVR tips below, I’ll assume that you have already installed UEVR and have proven that it works in your headset.
If not, click here for our UEVR installation guide, which shows you exactly how to download, install, navigate your plugins folder, and get things working for the first time.
UEVR Tips and Tricks
Setup Your Pre Injection Settings
Before you hit that Inject button in UEVR to render the game in your VR headset, you can change a few settings in the app.
Here are the ones to pay special attention to:
VR Rendering Method: You can choose from native stereo, synchronized sequential, or alternating/AFR
Synchronized Sequential Method: If you select synchronized sequential, then you have the option of enabling Skip Draw (skips viewport drawing on the next engine tick) or Skip Ticket (skips the next tick entirely). In my experience, Skip Draw works the best here.
Capped/Uncapped Framerate: This option enables the option to cap your framerate at a specific number.
From the UEVR documentation, native stereo is fully synchronized eye rendering. This works with most games and uses the actual stereo rendering pipeline in the Unreal Engine to achieve a stereoscopic image.
For most games, Native Stereo is the best option. However, it can cause crashes or graphical bugs if the game does not play well with it.
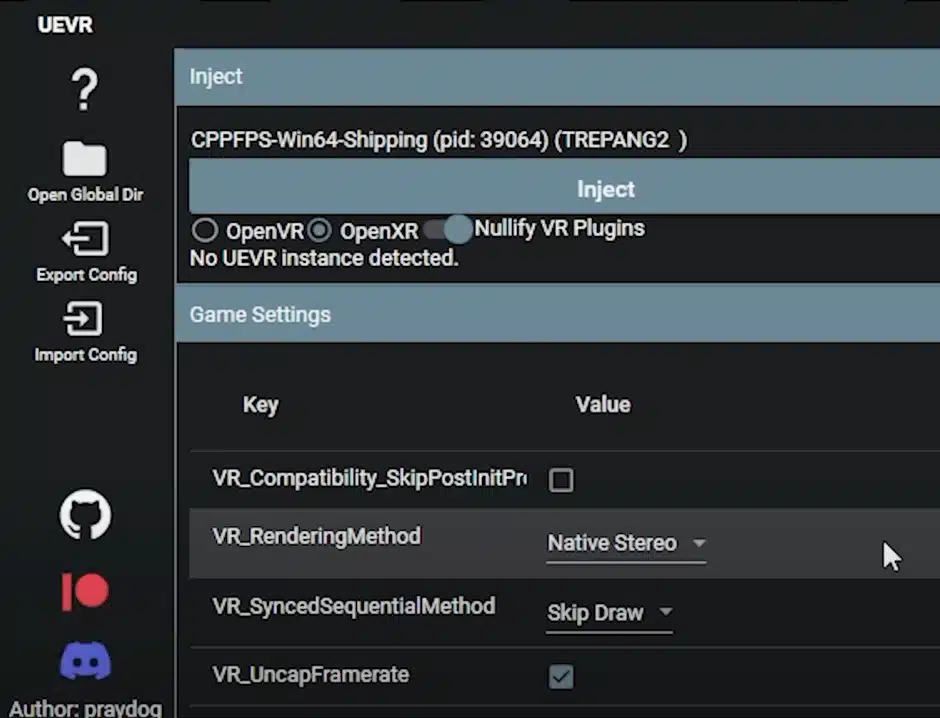
Selecting OpenVR vs OpenXR
When launching the UEVR mod, you can select between OpenVR and OpenXR based on your VR headset.
OpenVR is a runtime developed by Valve that offers compatibility with various VR headsets. Its benefits include broad compatibility and established support within the VR community.
On the other hand, OpenXR is an open standard that aims to unify VR development across different platforms. Benefits of OpenXR include improved cross-platform compatibility and future-proofing for upcoming VR devices.
Choose OpenVR for devices like PC-only headsets such as the HTV Vive or Valve Index. Select OpenXR for headsets such as the Meta Quest.
Selecting your desire runtime correctly creates the proper compatibility layer between your VR headset, the UEVR Injector software, and your PC.
Enable Depth Buffer Integration on Meta Quest
If you are using a Meta Quest with UEVR, then make sure you enable “depth buffer integration” in the UEVR software. It allows for more efficient rendering of objects at different distances. In VR, this is a bigger deal than in flatscreen.
Depth buffer integration gives you improved latency in OpenXR with Meta Quest.
Scale the Resolution of the Game
Scaling the game’s resolution is crucial, especially for high-quality games not originally designed for VR. Adjusting the resolution within the UE4 VR menu optimizes performance and ensures a smoother VR experience.
To set the right resolution in UEVR, navigate to the UE4 VR menu after injecting the mod. Locate the resolution settings and scale it down based on your preferences. I recommend always staying with a resolution lower than your VR headset’s resolution.
To help you out, here are the display resolutions of all popular VR headsets:
| VR Headset | Resolution |
|---|---|
| Meta Quest 3 | 2064 x 2208 |
| Meta Quest 2 | 1832 x 1920 |
| HTC Vive Pro 2 | 2448 x 2448 |
| Valve Index | 1440 x 1600 |
| HP Reverb G2 | 2160 x 2160 |
| Pimax 8K X | 3840 x 2160 |
| Oculus Rift S | 1280 x 1440 |
| Oculus Quest 1 | 1440 x 1600 |
Starting at a lower resolution and gradually increasing can help find the optimal balance between performance and visual quality
Reduce PC Resources
This trick helps conserve PC resources while maintaining an immersive VR experience.
Using a Browser Tab to Cover the Game
Covering the game with a browser tab minimizes resource usage because the game doesn’t need to render on both your monitor and headset simultaneously. This helps conserve PC resources while maintaining an immersive VR experience.
To do this, enlarge a browser tab onto the display screen of your PC where the game is rendered. This effectively covers the game on your monitor, saving resources.
Alternatively, you can use the built-in feature in the UEVR mod to hide the desktop view if you don’t have any need to switch back and forth.
Disabling the PC Screen from Within the Mod
Turning off the PC screen through the mod eliminates unnecessary rendering, saving additional bandwidth and resources. This is particularly useful when running high-quality games in VR.
To disable the PC screen from within the Mod, find the option to hide the desktop view within the UE4 VR menu. Enabling this feature ensures that the game is not rendered on the desktop, focusing all resources on the VR experience.
Reduce the Refresh Rate on Your VR Headset (down to 60Hz or 72Hz)
Lowering the refresh rate conserves resources, making it especially helpful for less powerful systems. While this may result in slightly reduced smoothness, it allows for a more accessible VR experience.
To implement this trick, access your VR headset settings and adjust the refresh rate to a lower value, such as 60Hz or 72Hz. Some games also let you adjust the refresh rate in the in game menu.
This adjustment should be balanced with your system capabilities and personal comfort preferences.
Optimize In-Game Settings
Before delving into UEVR-specific optimizations, thoroughly review your game’s in-game settings. Adjust settings as you would for a traditional flat-screen experience, optimizing them for your monitor and VR headset.
This ensures a solid foundation for further enhancements.
Some of the options that are most worth changing in my experience are:
turn off Vsync
adjust the AMD Super Resolution (for AMD card users)
enabling DLSS for Nvidia cards
Lowering long-distance graphical options that impact on performance with low benefit.
Consider raising or lowering shadows, foliage rendering, LODs, reflections, and volumetric effects depending on the intensity of the game.
World Scale Adjustment
In third-person games, tweaking the world scale can enhance performance, especially for lower-quality textures or effects. Playing on a smaller world scale can make these elements appear sharper, allowing for potentially lower resolutions without sacrificing visual fidelity.
Adjust the world scale within the game settings to find a balance that improves visual quality while maintaining performance. Experiment with different world-scale values, especially if encountering performance issues in third-person VR games.

Utilize Temporal AA Upscaling
In the absence of native upscalers like DLSS or AMD FSR, leveraging temporal AA upscaling can boost performance. It proves beneficial for enhancing visuals while maintaining smoother performance.
To do this, access the console or settings of your game and look for the temporal AA algorithm option. Switch it to an appropriate setting (e.g., quality or balanced) and lower the screen percentage to a value below 100.
This allows you to achieve a performance boost, especially in games lacking dedicated upscaling features.
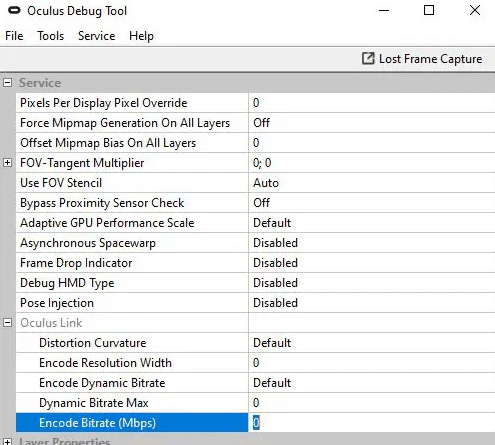
Use Oculus Debug Tool for Performance Monitoring
Use the Oculus Debug Tool to monitor performance metrics while playing in VR. This tool provides valuable insights into your headset’s performance, helping you identify potential issues and fine-tune settings for an optimal experience.
To do this, enable the performance overlay using the Oculus Debug Tool. This graph displays key metrics such as frame rate and latency. Analyze the graph during gameplay to ensure stable performance and adjust as needed.
Click here to download the Oculus Debug Tool.
Leverage Virtual Desktop Features
Virtual Desktop on Meta Quest offers additional features that can enhance your VR experience, including:
Snapdragon upscaling
asynchronous space warp
increased color vibrance
an automatic setting for space warp
Utilize these features to improve visuals and maintain performance. Experiment with these options to find the configuration that suits your preferences while ensuring a smooth VR experience.

Conclusion
As you can see, Praydog’s UnrealVR software contains a ton of shortcuts and options to improve your gameplay. These settings have been tested by a team of advanced players and each serve a special purpose.
If you are overwhelmed, don’t worry. For the most part, you can enable and disable these settings freely and then quickly check its impact in your VR headset while you play.