This step by step guide will show you how to install xCloud on your Oculus Quest so that you can play games from Microsoft’s Xbox Game Pass in your VR headset.
Project xCloud is a cloud gaming service that lets you play over 150 popular Xbox games anywhere you want. The service launched officially on September 15th, 2020.
Play Xbox games on the Oculus Quest using the step by step instructions below. Comment down at the bottom of this post if you are having any trouble!
What is Project xCloud?

Microsoft xCloud is a cloud gaming service from Microsoft which lets you play Xbox games from the cloud wherever you are. You can play on any device and anywhere as long as your wireless internet connection is fast enough.
You get access to all gaming features including online gaming and saving your progress across each device.
Similar services to xCloud include Google Stadia and Nvidia GeForce Now. Microsoft uses the Azure Cloud architecture to power the service, which has received really great reviews recently for also powering Microsoft Flight Simulator.
Price
In order to access xCloud, a Microsoft Game Pass subscription is required for $14.99 per month. Once you are enrolled, you get access to install xCloud on any platform.
Click here to subscribe to Xbox Game Pass.
Games
Over 150 games are includes with Project xCloud, including:
- Titanfall
- Ark: Survival Evolved.
- Bleeding Edge.
- Costume Quest 2.
- Crackdown 3 (campaign)
- Destiny 2.
- F1 201.
- Forza Horizon 4.
- Gears of War: Ultimate Edition
In general, all games that are powered by Microsoft’s Azure service are included and ready to play.
Click here to view a full list of xCloud games included in the service.
Things You Should Know
Before you go and install xCloud on your Oculus Quest, there are a few helpful things you should know!
Sideloading Required
In order to install xCloud on the Oculus Quest, you need to sideload the Android APK onto your device. This is no big deal, we have step by step instructions below in this guide. However, it does require your headset to go into Developer mode.
To put your Oculus Quest into developer mode:
- Open up the Oculus App on your phone
- Navigate to Settings > Select Your Headset > More Settings > Developer Mode
- Enable Developer Mode
- Restart your Oculus Quest headset.
Xbox Controller
You can use the Oculus Touch controllers for basic menu functionality. However, a real Bluetooth Xbox controller is required to play games with. Your Oculus Quest VR headset will act as the display.
We have a full guide for syncing Bluetooth controllers to the Oculus Quest to help you out if you are having trouble. Otherwise, we will show you the most important parts to syncing things up below.
Click here to buy a new Xbox controller!
Wireless Internet Speed
Your high speed internet speed is a big factor to how well xCloud will work for you. Streaming game services require at least 10 mb download speed on wi-fi in order to work. Microsoft also recommends that you connect to a 5 GHz wireless connection if possible.
Because things are wireless from Microsoft Azure, you may notice a little bit of latency. If there is anything you can do to decrease this, we will post it below in this guide!
Xbox Game Pass
In order to use xCloud, you need to be a subscriber to Xbox Game Pass. The cost for Game Pass is only $14.99 per month on its own. Or, you can buy a full year subscription for only $10 per month. You do not need to own an Xbox to become a Game Pass subscriber at all! You can pay $14.99 to get access to xCloud and decide after that if you want to commit long-term or not.
Click here to buy a 1 or 3 month Xbox Game Pass.
Click here to buy a 6 or 12 month Xbox Game Pass.
With that, let’s show you how to install xCloud on the Oculus Quest and play Microsoft Xbox games!
How to Install xCloud on the Oculus Quest
In this step by step guide, we will show you exactly how to install xCloud on the Oculus Quest to play Microsoft Xbox games wirelessly in your VR headset.
Total Time: 10 minutes
Before You Begin
![How to Install xCloud on the Oculus Quest [Step-by-Step] xbox game pass](https://arvrtips.com/wp-content/uploads/2020/09/xbox-game-pass.png)
Before you begin, make sure that you have a Microsoft Xbox Bluetooth controller and a valid subscription to Xbox Game Pass.
Download Project xCloud
![How to Install xCloud on the Oculus Quest [Step-by-Step] project xcloud](https://arvrtips.com/wp-content/uploads/2020/09/project-xcloud-1024x683.jpg)
xCloud is integrated into the Xbox Game Pass app. Click here to download the Xbox Game Pass Android APK. This same file is compatible with the Oculus Quest too.
Open SideQuest or adbLink

In order to install the APK, you need to sideload it onto the Oculus Quest. The two most popular apps for doing this are SideQuest VR and adbLink. We will show you how to install xCloud using either app!
Install the Project xCloud APK

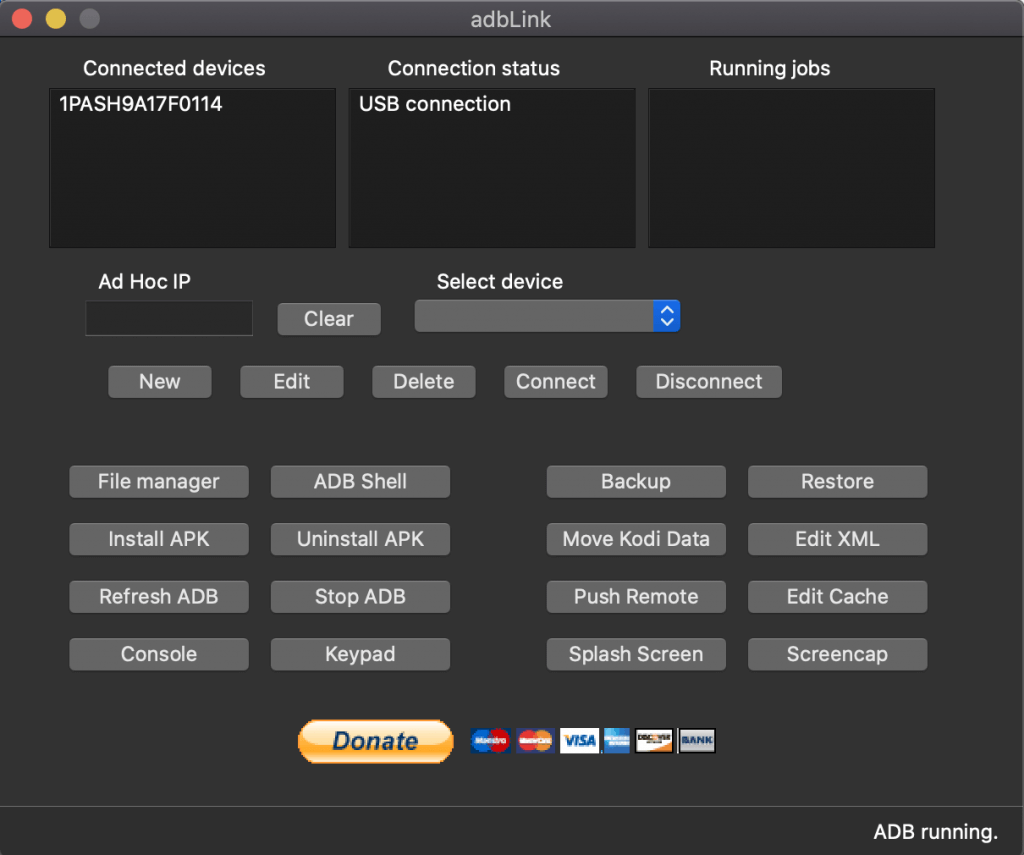
In SIdeQuest, you can simply drag and drop the Xbox Game Pass APK onto the top left SideQuest logo (when your headset is connected) to install it. In adbLink, you click the “Install APK” button in the screenshot above and then select your Game Pass APK.
Sync Your Bluetooth Controller to your Oculus Quest

Next, you have to sync up your Xbox controller with your Oculus Quest. To do this, launch the Oculus app on your phone and navigate to Settings > Controllers > Pair New Controller > Pair Gamepad and select your controller. You will have to confirm the connection in your Oculus Quest when you put it on by clicking the Pair button.
Launch xCloud and Play Games!
![How to Install xCloud on the Oculus Quest [Step-by-Step] install xcloud interface](https://arvrtips.com/wp-content/uploads/2020/09/install-xcloud-interface-1024x564.jpg)
You will now be able to launch xCloud from the apps section in your Oculus Quest! Check the “Unknown Sources” tab if you can’t find it.
And with that, you can now play Microsoft Xbox games on the Oculus Quest!
Comment down below and let us know if you are having any trouble.

![How to Install xCloud on the Oculus Quest [Step-by-Step] how to install xcloud on the oculus quest](https://arvrtips.com/wp-content/uploads/2020/09/how-to-install-xcloud-on-the-oculus-quest-300x225.jpg)
