If you want to transfer files from your PC to your Steam Deck or vice versa, you need first to enable SSH connections to your Deck. In the step-by-step tutorial below, I’ll show you how to set up and SSH into the Steam Deck from other devices.
SSH file transfer is popular for a few main tasks:
- Installing third-party games, apps, or ROMs.
- Transferring media files back and forth from your Deck.
- Installing mods on your favorite games
If you are having trouble after following the tutorial below, comment and let me know.
A video guide is also at the bottom of this post to help you out.
What is SSH?
SSH stands for Secure Shell Protocol. It allows you to set up a secure connection between two devices: your PC and your Steam Deck.
Once you enable SSH, you can transfer files between your two devices. It is easy to share files across your network without requiring a USB or MicroSD card.
Requirements for SSH on the Steam Deck
To get everything working, you need the following things:
- Steam Deck
- PC
- SSH Client for your computer (if you want to use a friendly user interface to transfer files)
Reasons to Setup SSH on the Steam Deck
There are several practical reasons why you want to SSH into the Steam Deck:
- You have media files you want to move onto the Deck to watch.
- You have downloaded config or mod files to move into a game folder on the Deck.
- You have new ROMs or BIOS files for old emulators that you need to get onto the Deck.
Whatever your reason is, we have instructions on how to set up and enable SSH on the Steam Deck below.
How to Enable SSH on the Steam Deck
By default, the Steam Deck does not allow computers or other devices to connect to it via SSH. This is a security decision that Valve made to prevent hackers from being able to log into your Steam Deck.
Luckily, enabling SSH on your Steam Deck is pretty straightforward. Below, I’ll also show you how to do this securely and safely.
Enter Desktop Mode
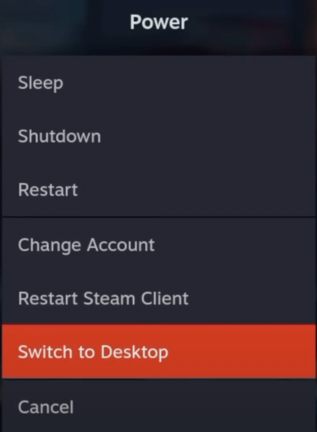
The first thing you want to do is go to Desktop Mode on the Steam Deck. Hold down the Steam button and select Switch to Desktop. Your Deck will go black for a second and boot up in Desktop mode.

Open Konsole
Before opening Konsole, you must launch the Steam application on your Desktop. This allows you to use the virtual on-screen keyboard again while in Desktop mode.
Then, launch Konsole by clicking on the Deck logo in the bottom right logo, clicking System, and then selecting Konsole.
Set a Sudo Password
By default, the Steam Deck does not have an admin password setup. This is for security reasons because no password means you cannot run root commands in the Konsole.
We need root access, so we have to set up a password. To do this, type passwd into your Konsole window and press enter. You will have to enter your password twice to set it up.
Note: Characters will not show up when you type your password. This is okay!

Enable SSHD on the Steam Deck
To enable SSH connections and commands, enter these two commands in the Konsole:
sudo systemctl start sshd
sudo systemctl enable sshd
The first command above starts the service and the second command ensures that it is activated each time your Deck reboots for whatever reason.
If you ever want to turn off SSHD support, you can replace “start” and “enable” in the commands above with “stop” and “disable” and run them again in the Konsole.
And that’s it. You can now SSH into the Steam Deck from your computer or another device.
Next, I’ll show you how to transfer files from your PC to the Steam Deck with an SSH client such as OpenSSH, Putty, or Filezilla.
Best SSH Software to Install
To move files onto your Deck, you need to install SSH software on your computer. This software can either be command line (line the Konsole terminal) or graphical, with a user interface.
Below, I’ll show you how to install all of the most popular options:
- OpenSSH
- PuTTY
- FileZilla
For most people, an interface is easier to use. A command line solution is more lightweight.
OpenSSH
Windows 10 and up has a good command line client called OpenSSH. You can install it by navigating:
- Click on the Start menu
- Type “Settings”
- Press Enter
- Click on Apps
- Select Apps and Features
- Click on Optional Features
- In the search bar, search for “OpenSSH”
- Select “OpenSSH Client” from the list
- Click on Install
To try it out, click on the Start button (bottom left corner), type PowerShell, and hit enter. In the terminal window that opens up, type ssh and hit enter. You will be guided on how to use the ssh command to get things done.
Linux computers already have an OpenSSH client installed, which works the same.
PuTTY
PuTTY is a popular SSH client for windows.
You can download it from the official PuTTY website here.
FileZilla
FileZilla is another popular SSH client for Windows. It also supports many other FTP and SFTP protocols, which transfer files from your computer to a server on the internet.
It might be overkill if you only plan to use SSH on the Steam Deck.
Click here to download and install FileZilla.
How to Transfer Files From PC to Steam Deck
Before trying the instructions below, ensure that your Steam Deck and your computer are connected to the same Wi-Fi network. This is a requirement before the two devices can talk to each other.
Connecting via PuTTY
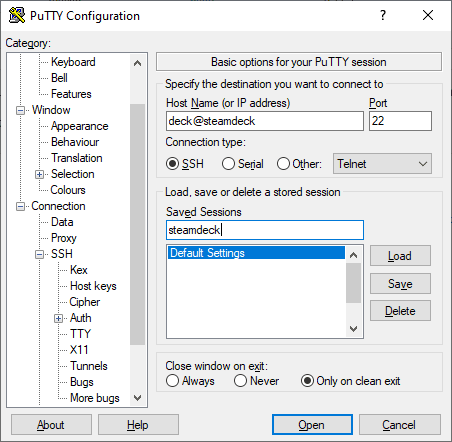
First, launch PuTTY. Under the Connection type, make sure that SSH is selected.
Under Host Name, enter deck@steamdeck and leave the port to the default option of 22.
Click on Open, and a black terminal window will open. You are successfully connected to your Steam Deck from your computer!

Connecting via FileZilla
First, launch FileZilla. Enter the following information in the window that opens:
- Host = sftp://steamdeck
- Username = deck
- Password = the password you set up above
- Port = 22
When you are done, click on Quickconnect to connect to your Deck.

Connecting via OpenSSH
If you didn’t install any software and plan on using the default OpenSSH option, click on the Start menu and type in PowerShell, and hit enter.
In the console window that opens, type ssh deck@steamdeck and press enter. Enter the password you entered above.
You’ve now connected to the Deck from your computer!
How to Move Files from your PC to your Steam Deck
After you connect to your Deck, you’ll want to know how to move files from your PC onto the Deck. The programs above (PuTTY and FileZilla) make this process seamless. In your left window, open up the folder on your PC with your files. On the right side, open up the applicable folder on your Steam Deck. Then, use your mouse to drag and drop files from your PC to your Deck and vice versa.
If you have a terminal window open, moving files can be done with the move (mv) command:
mv original_file_location new_file_location
How to Copy Files from your PC to your Steam Deck
If you want to keep a copy of the file on your PC, then you can use the copy (cp) command:
cp original_file_location new_file_location
On FileZilla and PuTTY, the process works the same way. By default, files will usually copy over and not move from one location to the other. However, I always right-click on the file where I don’t need it and delete it.
Video Tutorial on How to SSH into the Deck
Do you still need some help getting things set up? Here is a good video tutorial that goes over everything I did above!
Conclusion
A lot of the steps above to setup SSH into the Steam Deck are one-time steps. After you have your sudo password setup and activated, things are straightforward. Once you learn how to copy or move files the first time, everything becomes a lot easier.
You can now move games, apps, mods, ROMs, and other media files to your Steam Deck via the SSH protocol!
Go and check out some of our other Steam Deck tutorial guides:

![How to SSH into the Steam Deck and Transfer Files [Step-by-Step] how to ssh into the steam deck to move copy files](https://arvrtips.com/wp-content/uploads/2022/11/how-to-ssh-into-the-steam-deck-to-move-copy-files-300x225.webp)
