The Steam Deck performance overlay menu allows you to adjust the graphics and quality of games on your Deck. Getting the right settings will extend your battery life without impacting graphics quality as you view them on the 7-inch screen.
In this guide, I’ll go over the performance menu in full detail, including:
- The difference between the simple and advanced views
- How to access the menu
- The best performance settings for the Steam Deck
These performance settings, like adaptive brightness, let you extend the battery life of the Deck if implemented correctly.
If you prefer other settings that are different than mine, comment down below and let me know! You might be able to help others out, too.
Click here to view Steam Deck Black Friday deals.
What is the Performance Overlay Menu?
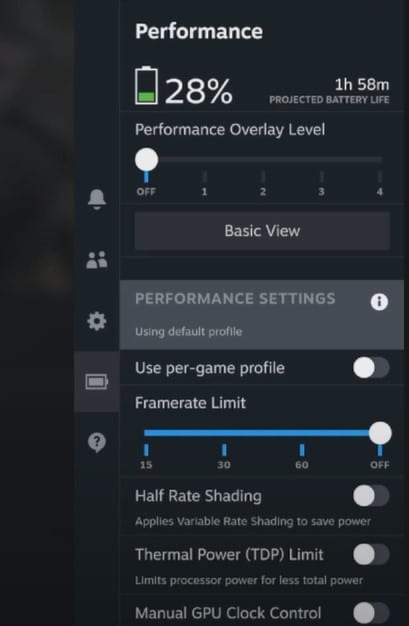
The performance overlay menu is a special settings screen that gives you granular control over your Steam Deck graphical settings. Once you know how to access it, you can view either the simple view or a more advanced view.
Simple View
By default, you will see the simplified performance menu on your Deck. The simple menu shows you two pieces of information:
- The current battery level percentage and the project battery life you have remaining
- The current performance overlay level is a universal setting for how much information you want displayed in the top-left corner while playing games.
At the bottom, there is also a button labeled Advanced View, which is what you press if you want even more options to configure and view.

Advanced View
If you click on the “Advanced View” button, a number of extra options will become available to you, including:
- A toggle for per-game profiles
- Framerate limits
- Half rate shading
- Thermal power (TDP) limit
- GPU clock control
Below, I’ll go over each of these options in a lot of detail
What is the Performance Overlay Level?
The overlay level, from 0 to 5, adjusts how much diagnostic information is shown in the corner of the Steam Deck while you play:
- Level 0: Nothing is shown.
- Level 1: Displays Frames Per Second (FPS) in the top-left corner, indicating how smoothly a game runs.
- Level 2: Adds battery level, GPU, and CPU usage percentages with power consumption, RAM usage,
gamescopeframerate, and a frame time graph across the top. - Level 3: Similar to Level 2 but in a box layout, showing CPU/GPU temperatures, battery time remaining, and VRAM usage.
- Level 4: Includes CPU and GPU clock rates, cooling fan RPM (FAN), FSR status, and frame count rendered
Note: In software update version 20221107.1101, Valve quietly updated the Level 2 information to spread out across the top of the screen rather than stack in the top-left corner.
How Do You Access the Steam Deck Performance Menu?
Valve wanted to give you ultimate access to your Deck, so they made the performance menu easy to access. To open it up, press the three dots button on the right side of the gamepad.
Simple!
Steam Deck Performance Overlay Recommendations
For each advanced option, here are my recommendations for what to do with them.
Performance Settings
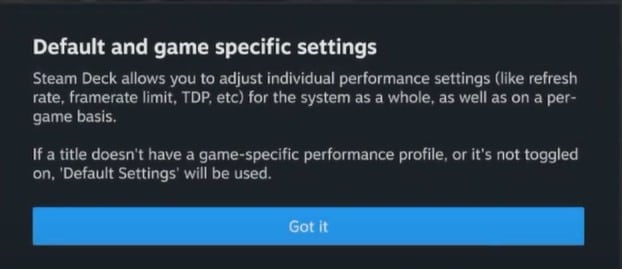
The first option on the screen is called “Performance Settings,” and this is an information message about the entire screen that reads:
Default and game-specific settings
Steam Deck allows you to adjust individual performance settings (like refresh rate, framerate limit, TDP, etc) for the system as a whole, as well as on a per-game basis.
If a title doesn’t have a game-specific performance profile or it’s not toggle on, ‘Default Settings’ will be used.
The message is self-explanatory and goes with the next option below for per-game profiles.
Use Per-Game Profiles
This is a toggle button that only appears when you are in a game that supports a per-game profile. If you see this toggle, turning it on allows you to use a profile optimized for the Steam Deck’s screen and power.
If the game you are playing has this toggle, I recommend turning it on. Someone else has made the effort to optimize the graphics settings for the Deck, and you will get to benefit from that!
Steam Deck Per-Game Profile Advantages
Using per-game profiles has a few advantages:
- Longer battery life
- Less framerate drops
- Optimized graphics for the screen
Over-the-top graphic settings designed for hardcore PC gamers will be turned off because you are playing games on a 7-inch screen.
Framerate Limit
The framerate is how many frames per second (fps) are rendered on the screen. Your eyes can only process images at 30 frames per second, but many modern games are rendered at 60 frames. This gives a smoothing effect and less blurriness during high-speed scenes in a game.
If you don’t care about this, you can limit your frame rate here to 30 fps and save battery life.
The options for framerate limit on the deck are:
- 15
- 30
- 60
- Off
Half Rate Shading
This is a toggle button that applies variable rate shading to the game you are playing on the Deck.
A lot of processing power is used up rendering shadows and more minor object details in the games you play. Because the Deck has a 7-inch screen, you won’t notice many of these details. By turning this toggle on, Steam will simplify how it renders shading in your game to save you battery life.
You don’t want to turn this on if you are playing desktop games because of the bigger monitor size, but it’s a good option on the Steam Deck.
If you want to see the difference between half-rate shading off vs on, you can look at the pictures below.


Thermal Power (TDP) Limit
This toggle button allows you to adjust the maximum number of watts that your Deck processor is able to draw at a time. The default option is 15 watts.
Turning this number down will save you battery life, but it will limit how well your Deck can process the game you are playing. You will experience quality loss playing an AAA game title with a limited TDP.
GPU Clock Control
The GPU clock control is a toggle button that allows you to adjust the frequency of your GPU, in hertz (HZ). The default option is 1600 Hz.
If you turn this number down, it will lower the times your GPU can process graphics each second. Again, you will experience quality loss if you play a high-quality game. However, turning this number down will extend your battery life.
From my experience, adjusting the GPU clock control to 1200 Hz has given me up to an extra hour of gameplay without a noticeable drop in performance for most indie games.
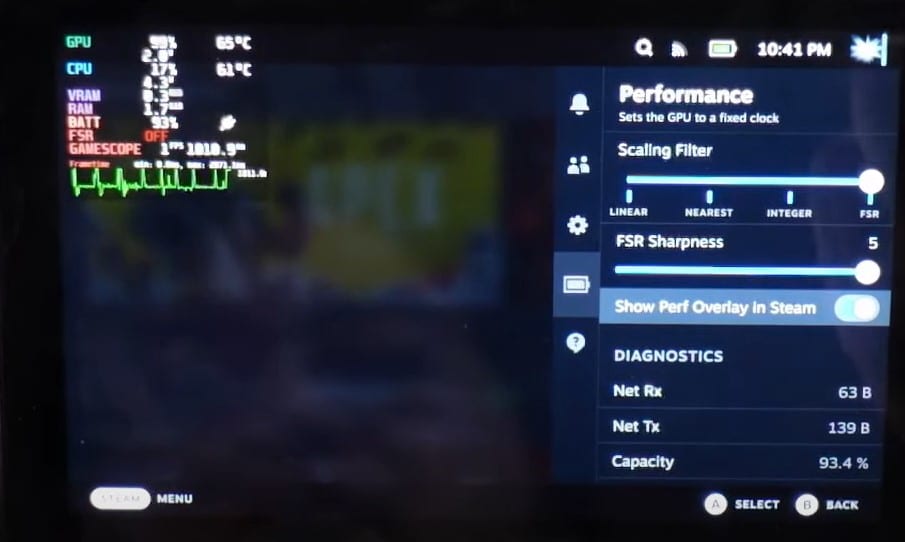
Scaling Filter
Scaling filter is an AI algorithm that allows you to upsize your graphics to a higher quality. This is equivalent to DLSS on an Nvidia graphics card. It’s a cool feature that allows you to get 4K graphics quality on a game that was never designed to be that high quality.
Your four options for scaling filter are:
- Linear: 1:1 graphics quality, no scaling
- Nearest: 1:2 upscaling, but pixels could be distorted if they are non-integer
- Integer: 1:2 upscaling using integers to increase image quality without any pixel distortion.
- FSR: Full AI upsizing
For the most part, you should use your scaling filter at Linear setting. An advanced trick would be to lower your game resolution down to 480p or 540p and then turn your scaling to FSR and upscale the graphics to 700p.
This will get you a similar game quality, but save on graphics power.
Show Perf Overlay in Steam
This is a toggle button which allows you to view the current framerate and GPU usage live while you are playing your games. This is helpful to determine how well your Steam Deck is running the game you are playing, but is also distracting!
I recommend only toggling this on temporarily when you are curious to see how things are running. This toggle, plus the Performance Overlay Option at the top of the screen, determines how much information is shown to you.
When it is on, here’s what the performance overlay looks like in the top left corner.
Best Steam Deck Performance Settings
If you are going for a good mix between battery life and graphics quality, these are the performance settings I recommend:
- Enable per-game profiles
- Put your framerate limit to 60
- Turn on half-rate shading unless you notice adverse effects
- Turn your scaling filter to Linear
Performance Overlay – Video Help
If you need more help checking out the performance overlay settings, here is a great video I recommend from Endless1UP. He has posted several Steam Deck videos on his Youtube channel.
Conclusion
With my hands-on experience and the latest insights from Valve, I’ve found that these tweaks to your Steam Deck’s performance settings strike a perfect balance between longevity and visual fidelity.
Per-game profiles are a gem, tailored to the Deck’s unique hardware. I highly recommend using them.
Always remember to keep your system updated for the best results. Dive into your Steam Deck’s performance overlay and share your go-to settings below. Your insights could be a game-changer for the community!
Check out the Steam Deck performance overlay yourself, and let me know what settings you recommend to others.